https://www.icondev.io/docs/part-1-helloworld-on-local-emulated-environment
Part 1. HelloWorld on local emulated environment
## Install T-Bears (Docker) - Install Docker [[Get Started with Docker](https://www.docker.com/get-started)] - Install T-Bears and run the container. Below command will download tbears docker image, create a container, start the container, and attach your
www.icondev.io
|
snap install docker
docker run -it -p 127.0.0.1:9000:9000 -p 127.0.0.1:5000:5000 --rm ibriz/icon-workshop:latest
|
아이콘 테스트넷(여이도)를 버추얼박스에 구동한 것이다.
지갑은 알아서 잘 설치 하시고 ㅎㅎ ICONex 크롬 플러그인 형태로 되어 있다.
여이도로 테스트넷도 잘 변경 하시고,,
10분 마다 20ICX식 코인을 준다 .
http://52.88.70.222/
구글 통해서 메일을 보내면 100 ICX를 보내 준다.
구글에서 생성한 키스토어는 잘 백업을 해놓아야 된다. 나중에 docker 내부에서 deploy 할떄 사용 된다.
이더리움은 MetaMask와 remix에서 ropstone테스트넷을 편하게 작업 할수 있는데 ,,
더 최신으로 나온 메인넷이 더 불편하다.
파란색 부분이 tx이고 u 뒷부분은 테스트넷을 가르친다. 매번 해주는게 속편하다.
config에서 파일 내용을 수정했음에도 불그구고 반영이 잘 안되는거 같다.
|
root@e3c558b878a6:/tbears# tbears deploy hello_world -k keystore_test1 -p 패스워드
Send deploy request successfully.
If you want to check SCORE deployed successfully, execute txresult command
transaction hash: 0x05eb7c6a2896dd663ae9b1b7dcfa000302408ef6a5deb0030dec589d1bbfdf72
root@e58bee10c63d:/tbears/icon-dice-roll# tbears txresult 0xb61f94a8f4edde2929eb 6d4909a7a2689eebca418f8549ca84057bedb0f8a9ee -u https://bicon.net.solidwallet.io /api/v3
Transaction result: {
"jsonrpc": "2.0",
"result": {
"txHash": "0xb61f94a8f4edde2929eb6d4909a7a2689eebca418f8549ca84057bedb0f 8a9ee",
"blockHeight": "0x6ffbb",
"blockHash": "0x8c7a1b8afdb3aa45e5770ee536e7de54e0465047cde1462854d1d438 30d5d32b",
"txIndex": "0x0",
"to": "cx0000000000000000000000000000000000000000",
"scoreAddress": "cx03ae895604c327a423db7c6b479bf7df3f2ad65d",
"stepUsed": "0x3ebd4208",
"stepPrice": "0x2540be400",
"cumulativeStepUsed": "0x3ebd4208",
"eventLogs": [],
"logsBloom": "0x00000000000000000000000000000000000000000000000000000000 00000000000000000000000000000000000000000000000000000000000000000000000000000000 00000000000000000000000000000000000000000000000000000000000000000000000000000000 00000000000000000000000000000000000000000000000000000000000000000000000000000000 00000000000000000000000000000000000000000000000000000000000000000000000000000000 00000000000000000000000000000000000000000000000000000000000000000000000000000000 00000000000000000000000000000000000000000000000000000000",
"status": "0x1"
},
"id": 1
}
|
https://bicon.tracker.solidwallet.io/transaction/0xb61f94a8f4edde2929eb6d4909a7a2689eebca418f8549ca84057bedb0f8a9ee

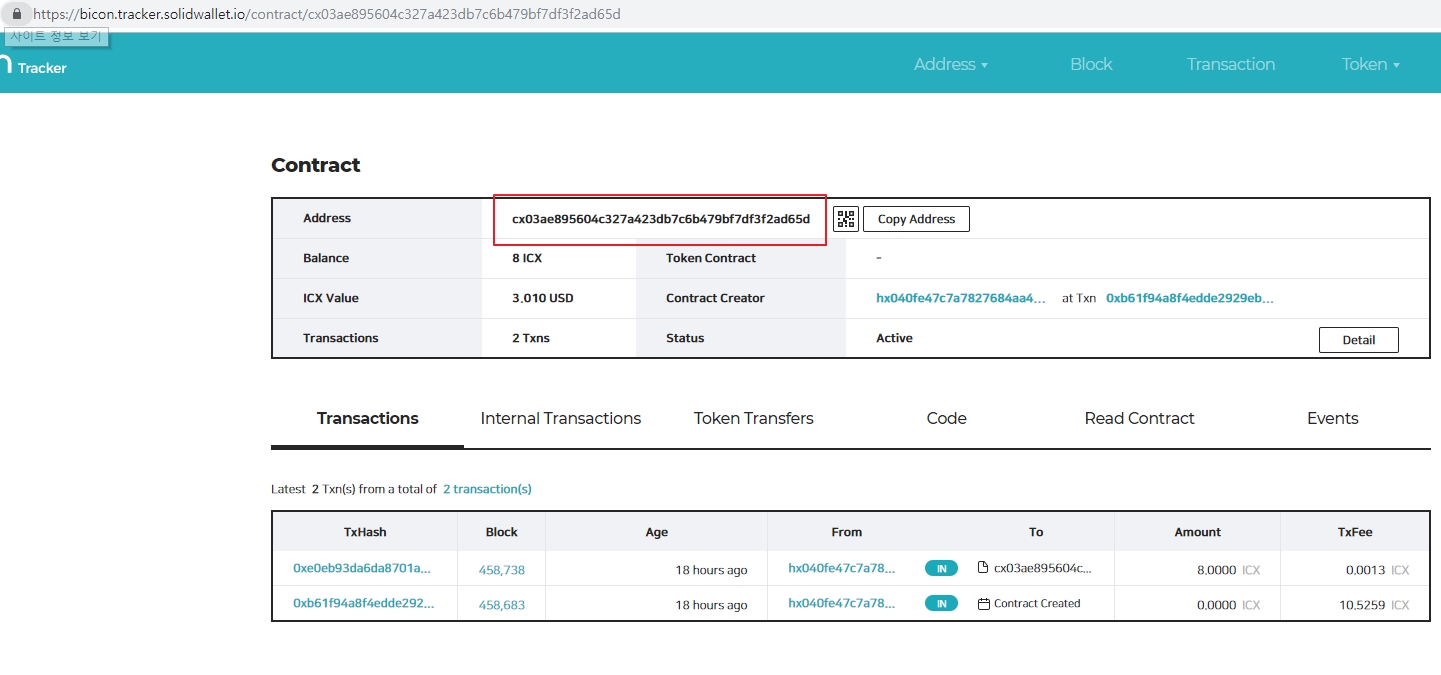
scoreAddress가 스마트컨트렉 주소에 해당 되는걸 알수 있다.
https://bicon.tracker.solidwallet.io/contract/cx03ae895604c327a423db7c6b479bf7df3f2ad65d
잔액 조회
tbears balance hx040fe47c7a7827684aa4c0bfcfdbbbdbb3ec3b6a -u https://bicon.net.solidwallet.io/api/v3
balance in hex: 0x56bc75e2d63100000
balance in decimal: 100 000000000000000000
root@52ff571eb880:/tbears/icon-dice-roll/keystores# |
소수점은 18자리 까지 있다. 너무 좀 과도 한거 같기도 하다.
icon-dice -roll에 hello_world 출력하는 구문을 작성해 보았다.
/tbears/icon-dice-roll에
keystore_test1
tbears_cli_config.json
가져다 놓고
packge.json
"version": "0.0.1",
"main_file": "diceroll",
"main_score": "diceroll"
} |
diceroll.py
|
from iconservice import *
class diceroll(IconScoreBase):
def __init__(self, db: IconScoreDatabase) -> None:
super().__init__(db)
def on_install(self) -> None:
super().on_install()
def on_update(self) -> None:
super().on_update()
@external(readonly=True)
def hello(self) -> str:
return "Hello"
|
dice_roll로 디렉토리를 두고 실행은
| tbears deploy dice_roll -k keystore_test1 -p 패스워드 |
실행하면 된다.
처음 디플로이 할때 디렉토리를 디플로이 해주는 형태인거 같다.